DV device setup for LifeFlix v3.6
Efficiently transfer DV tapes to Mac with these simple steps using LifeFlix v3.6.
Transferring analog DV tapes from a camcorder to an Apple Mac computer involves several steps. Here’s a detailed guide to help you archive your DV tapes digitally:
Here’s what you'll need:
- Digital Video (DV) Device: Preferably the camcorder that originally recorded the tapes.
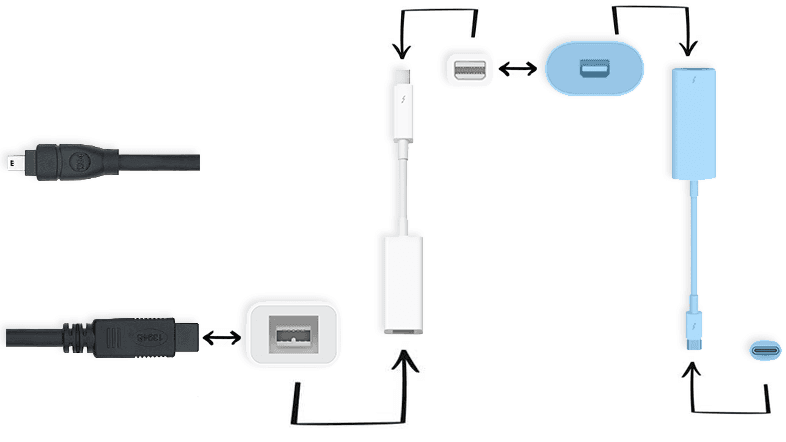
- DV to Firewire Cable 800 (1394B 800-400 IEEE)
- Apple Thunderbolt to FireWire 800 Adapter (A1463)
- Apple Thunderbolt 2 to Thunderbolt 3 USB-C (MMEL2AM/A)
- Mac Computer: Equipped with appropriate ports or adapters.
- LifeFlix: https://www.lifeflix.com
Steps for Transferring DV Tapes to Mac
1. Locate the DV port on your DV Device. It is typically indicated by the “DV” letters.
2. Connect the 4 pin end of the 1394B to the DV Device and the 9 pin end to the A1463 Firewire Adaptor.
3. (Optional): If your Mac device does not have a Firewire port, connect the MMEL2AM/A adapter to the end of the A1463 adapter. This will leave the 4.4.USB-C end of the cable available to connect to your Mac device.
4. The chain of cables connected is considered a “daisy-chain’. Connect the available end of your daisy-chain to your Mac Computer.
5. Power on your DV Device and set it to VCR or VTR mode.
6. Launch LifeFlix.
Important! Please close any applications that can detect your connected device. This will interfere with LifeFlix’s ability to establish a successful connection with your device.
Most Popular
Join Our LifeFlix Community
Enter Your Email Address to Sign Up for Exclusive Updates!
Own your
memories
forever
withLifeFlix!
Related Guides
Using LifeFlix on Older macOS Versions
Use LifeFlix on older macOS versions with these downloads and activation steps.
Read More ➜
LifeFlix Version 5
LifeFlix v 5 is officially out! Best Mac software to digitize all your legacy based tapes with ease. #VHS, #MiniDV, #HDV, #Video8, #Hi8, and #Digital8
Read More ➜