How to get the maximum out of LifeFlix Features

Effortlessly digitize, organize, enhance, and share your precious memories.
Don't worry, LifeFlix has the solution you’ve been waiting for!
Digitizing, organizing, enhancing and sharing your precious videos is a breeze with LifeFlix's user-friendly interface and powerful tools.
Here are a few essential tips to ensure a smooth and rewarding LifeFlix experience.
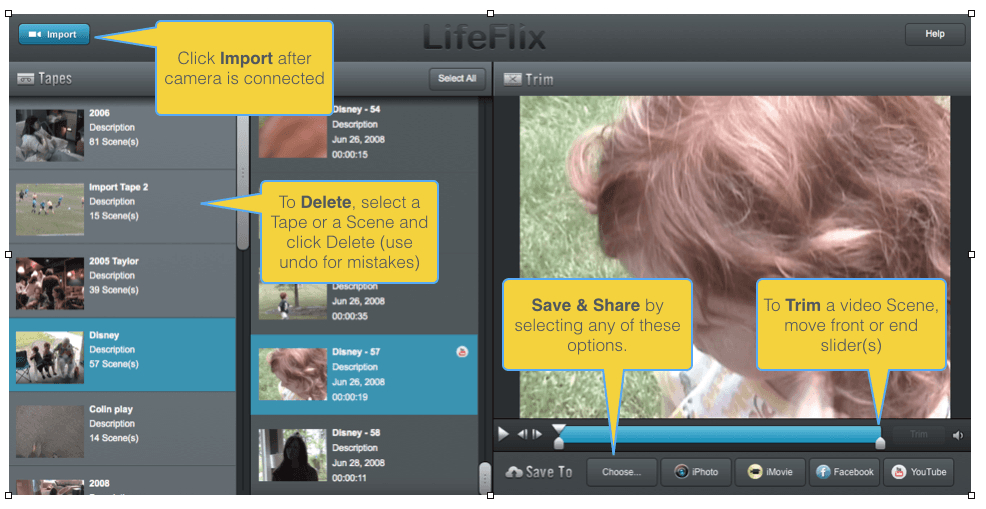
1. How to: Import
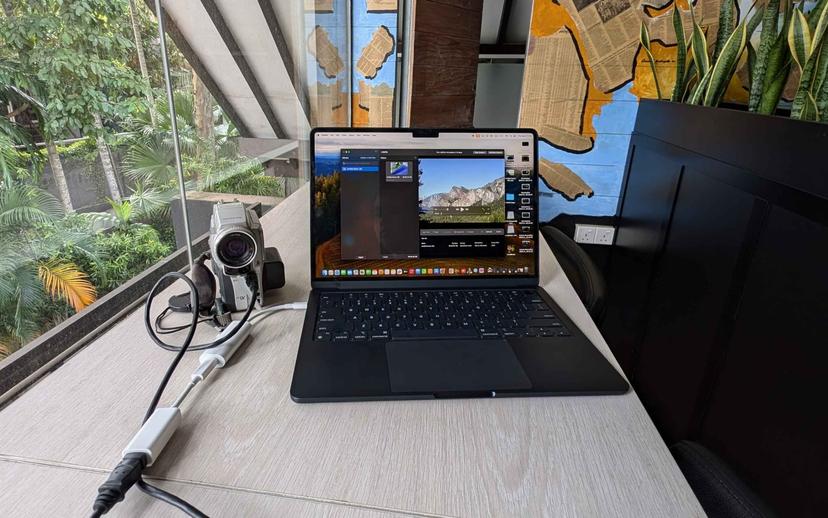
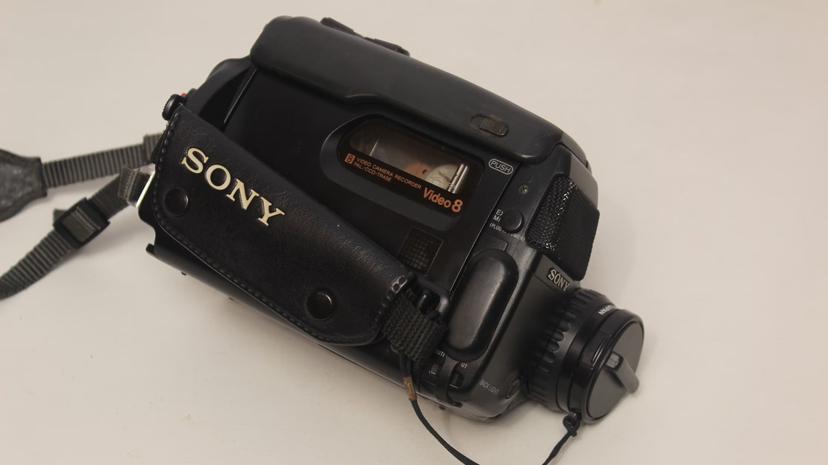
LifeFlix has an import workflow to archive the footage from your tape devices. A successful connection must be established between LifeFlix and your device to begin the import process.
The following are steps for importing footage:
- Click “Import”. This will launch the Import interface.
- Fill out the tape name and description you want associated with your captured footage.
- Select any of the import options.
- Rewind Tape Before Import: This will automatically use your device’s rewind function to rewind your tape to the very beginning.
- Compress to save space: Tapes can vary in length and at times can be long. The longer a tape, the more storage space it will use. Enabling this setting will lower the quality of your tape so that it uses less storage space.
- Convert to HD On Import: Enabling this setting automatically upscales your captured footage to HD. You will always have the ability to convert your scenes to HD after import as well.
- Click “Cancel” to close the menu. Click “Import” to begin capturing your footage.
- Your tape will automatically play from your device once the import begins. Your tape will automatically rewind to the next available time break if “Rewind Tape Before Import” was enabled. Your footage will automatically begin once this finishes.
- Click “Stop” to end your capture.
- Click “Resume” to resume capture from the moment you last ended your capture. Be sure to not manually rewind your tape if you plan to use this option.
2. **How to: Delete
If you've stumbled upon a video that's not exactly your cup of tea, deleting these unwanted videos is a straightforward process.
- You can delete any tape or scene by selecting them and navigating to the top tool bar and clicking “Edit” then from the dropdown menu select “Delete”.
- Scenes can also be deleted by selecting the “File” option at the very top of your display and clicking the “Delete” action.
3. How to: Trim
Trimming videos allows you to remove unnecessary footage and focus on the most important segments. Any scene that is archived by LifeFlix can be trimmed from the main interface. The playback monitor will display the footage of any selected scene and be accompanied by a timeline.
- Each end of the blue bar has a marker. Hold and drag the marker on the left side to create a new starting point. You can do the same with the marker on the right to create a new ending point.
- Once you've defined your desired trimming points, click on the blue "Trim" button to execute the trimming process.
- When you trim your footage, it will overwrite the currently selected scene with the new trimmed duration.
- Any scenes that have been trimmed can be identified by the trim icon from the “Scenes” area.
4. How to: Upscale
Video footage imported into LifeFlix or already imported can be converted into High Definition (HD) files, however it cannot be converted back to SD.
- By enabling Convert to HD On Import in the setting automatically upscales your captured footage to HD. You will always have the ability to convert your scenes to HD after import as well.
- If you happen to import footage as Standard Definition (SD), you can always convert it to HD at any moment.
- Converting your tapes to HD will boost its visual fidelity and upscale its native resolution to 1920 x 1080 and lead to file size getting larger.
5. How to: Share
Share your memories with friends and family quickly by simply clicking the “Share” button. This will display a bubble with recent contacts from Apple Message and a list of all other options available to share with.
AirDrop: AirDrop is a quick and easy way to remotely share your footage with other Apple devices. To share with an iOS device, open the Settings and search “AirDrop” and turn on “Everyone for 10 Minutes” or “Contacts Only”. On a Mac, go to AIrDrop in the Finder.
Click the Airdop option after clicking “Share” and a window with instructions will appear. If a device with AirDrop on is detected, that device type and device owner will appear in the bubble. Select the device and it will show a loading icon. Once done, your video has been shared successfully. Click “Done” to close the window.
Note: The steps to enable AirDrop will vary on older versions of iOS and macOs. Please consult Apple Support to find specific instructions for AIrDrop for other versions.
Mail: Clicking the Mail option from the “Share” menu will launch your Mail app with a new message ready to be composed. Create a subject line, select recipients and add a Message body. Your footage will automatically be attached to the message.
Messages: The Messages option will launch a window that gives you the ability to compose a text message. Add any recipients from your contacts list or any phone number. Your footage will be attached to the message.
Notes: Create a note that contains the footage you shared as an element within the note. You have the option to create a new note or append an existing note with your footage.
Photos: This will add your footage to your Photos.
Important! Some of this functionality will change as Apple releases new iOS and macOS versions.
Let the journey of preservation start, armed with these essential tips. Here's to preserving the past, celebrating the present, and creating a future filled with unforgettable moments. Happy LifeFlixing!
Most Popular
Join Our LifeFlix Community
Enter Your Email Address to Sign Up for Exclusive Updates!
Own your
memories
forever
withLifeFlix!
Related Guides
LifeFlix Version 5
LifeFlix v 5 is officially out! Best Mac software to digitize all your legacy based tapes with ease. #VHS, #MiniDV, #HDV, #Video8, #Hi8, and #Digital8
Read More ➜
Manual on film digitisation
Lifeflix v4.2.5 simplifies digitizing and editing old tapes with intuitive tools, advanced features, and easy importing for preserving your memories.
Read More ➜